PhotobucketPhotobucketPhotobucketPhotobucketPhotobucket
Showing posts with label Trying to be crafty. Show all posts

5.06.2015

My green front door

 So about two years ago we bought a lot right next door to the home we were renting with plans to build a new home.  About six months later we actually got moving and started construction on our lot.  It was BEYOND overwhelming...mostly because I really didn't know what I wanted and there were so many choices.

Although I was really in over my head, there were a few things that I knew I wanted...basically a white kitchen with blue subway tile, a dark navy blue exterior on the house, and a bright, fun door!  My husband was with me on everything...except for that bright fun door ;)  It took some serious compromising to avoid another plain white door, but I finally got him to give!  (Just in case your are wondering, I had to give in to the ridiculously big shower he wanted that I thought was a total waste of space.  Now I absolutely love it so it actually worked out all right for me ;)

I remember posting the paint swatch I wanted to use on FB and asking all my friends what they thought.  Everyone seemed to love it, and really...I had already make up my mind and was just looking for some positive reinforcement ;)  For YEARS now I have been loving the blue and green combo, so I figured a funky lime-y, apple-y green would be a great compliment to my dark blue exterior.


Honestly, it turned out even better than I imagined!  I love how it brightens up my entryway and shows off a little bit of our family's crazy personality too.


I have also loved how easy it has been to decorate for the different seasons.  I just threw this wreath together a few nights ago with some hydrangeas, floral sprays, and ribbon from Hobby Lobby.  It took under 10 minutes to glue everything together and I love the finished product. 


According to Pinterest a green front door evokes feelings of peace, health and growth.  These are ALL feelings we strive for in our crazy, loud, and exciting family of 7...especially the peace part ;)

So what do you think about the painted front door trend?  Do you have a fun front door, or do you prefer something a little more classic?  Thanks for checking us out today and have a lovely Wednesday!

7.03.2013

Rolled Fabric Flowers from Bandanas

 Here is a quick, simple way to add some Patriotic flair to your little ones this 4th of July!  Its also a great, inexpensive craft for Young Womens or Activity Days :)  All you need to make these cute fabric flowers are some bandanas and fabric glue...easy peasy, right?!


I cut my bandanas into strips, then once I had them rolled into flowers I hot-glued them to some barrettes I had on hand.


I followed this great tutorial I found HERE...she has wonderful pictures and step-by-step instructions!


This is the one Skylar helped me make, isn't she adorable?!  We did this with out 8-9 year old girls yesterday and they were all able to make them.  Now my mind is filled with possibilities...I'm thinking next year's 4th of July wreath needs to have these bandana rolled flowers!

Thanks so much for stopping by today!  And if you like what you see, follow Blue Skies Ahead on Bloglovin!!!

Follow on Bloglovin


3.22.2013

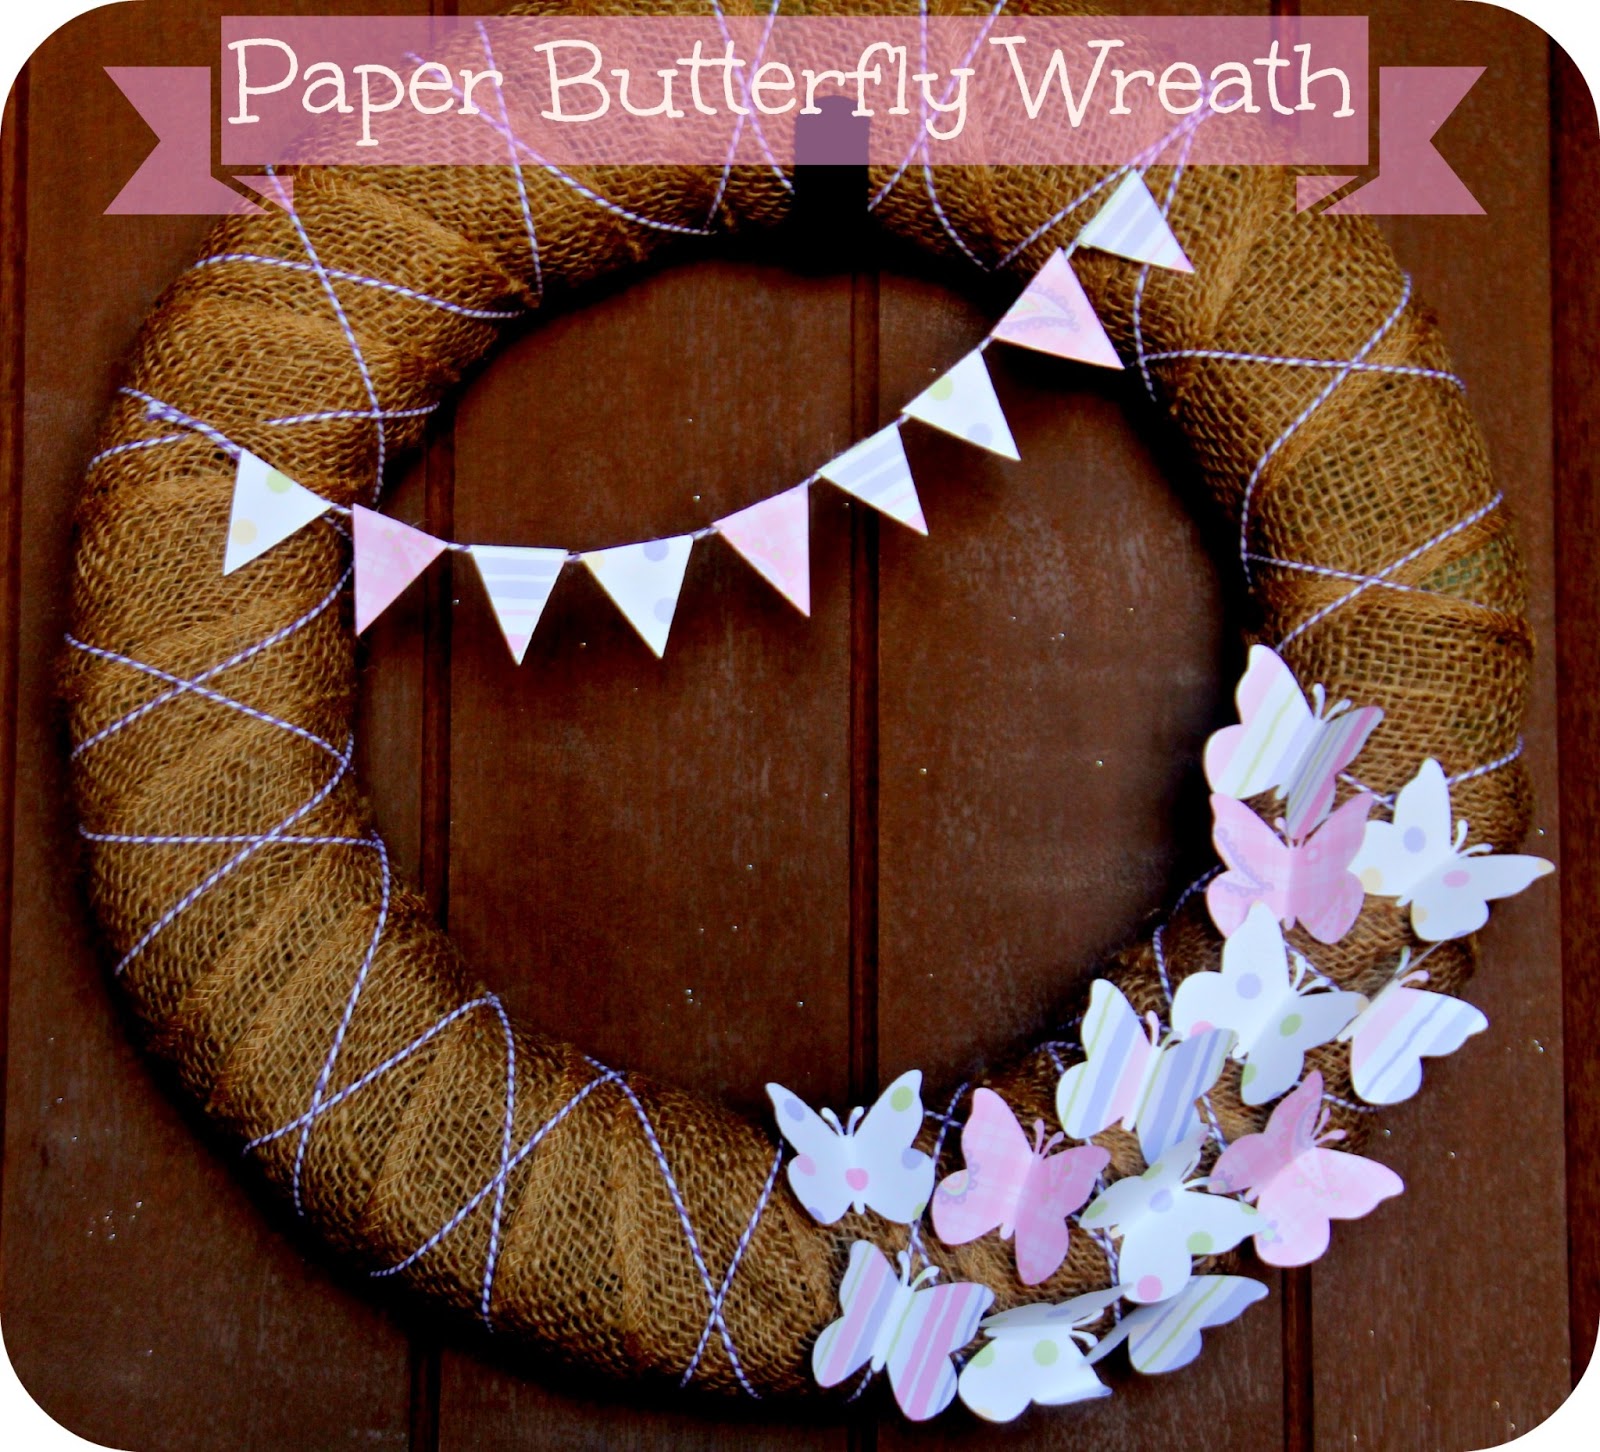
Paper Butterfly Wreath


Happy Friday everyone!  I have a really fun, simple wreath to share with you today.  This was a lot different than most of the wreaths I have made.  I always tend to gravitate towards bright, funky colors...but with Easter on its way I really wanted to try something with pastels, and I actually loved how it turned out.  I also wanted to try something besides fabric flowers, and once again knew I needed to use things I had on hand...so this is what I came up with :)

I give you my Paper Butterfly Wreath!


The first thing I did to make this wreath was to get 3 coordinating sheets of scrapbook paper and my butterfly punch.  I punched several butterflies from each sheet, and then folded them in half to make the wings stand up. 


Then I simply covered a wreath form in burlap and used some purple twine to accent it and add a little pop of color. 


Using the same scrapbook paper I cut out a few triangles and glued them to some twine to make a sweet little pennant to hang across the top of the wreath.


Finally I randomly hot-glued my paper butterflies on the wreath and I had my finished product!


I love how simple and bright this made my dark brown door look...now if I could just get the weather here to cooperate with my desire for all things spring I would be one happy girl! ;)  Thanks so much for stopping by today, hope you and your loved ones have a fabulous weekend!!

Linking up HERE :)

3.20.2013

Spring Has Sprung Activity Jar!


Spring is in the air...and I am LOVING it!!

It is so wonderful to look out my window and see the sun shining and hear the birds chirping away, spring is definitely on its way.

I was feeling crafty, but since I couldn't go to the store to get supplies I was inspired by things I had on hand.  Not too long ago I got some really adorable spring washi tape from my most favorite Pick Your Plum.  I also received a pack of Jumbo Popsicle Sticks from the wonderful people at CraftProjectIdeas.com.  

Put these two together and I created our Spring Has Sprung Activity Jar!


First up I got out my Jumbo Popsicle Sticks.  These are a must-have for my craft stash...there is always something fun you can create with them.


I covered each stick in a strip of cute, springy washi tape.


Then on the back of each stick I wrote a fun spring-time activity my kids would enjoy.  Well, honestly they may not be thrilled about ALL of them...I did include a couple of spring cleaning chores too ;)


Then I simply put them all in a mason jar, set them on my counter, and enjoyed the little pop of SPRING!


But...I can never leave anything alone the way it is.  I remembered I had these mini-chalkboard clips in my stash and thought they would add the perfect finishing touch.


Activity Jars like this are a HUGE hit at our house!  Instead of turning on the TV or computer when your kids are bored, you let them pick a stick out of the activity jar.  They are excited to see what they get, and you get to spend some quality time with your littles...a definite win-win!!

Linking up to these fun parties HERE!

3.13.2013

Bed rest = Projects

 Hello friends!  How are you all doing this lovely sunny day?!  At least I think its sunny...I haven't actually stepped outside ;)

Here at Blue Skies Ahead we know ALL about bed rest.  Its pretty much been a given since I had my first daughter 8 years ago at 32 weeks.  Ever since I have spent varying amounts of time on bed rest with each pregnancy...and each baby has come later, success!!

Bed rest is tough for me.  As a (usually) busy mom of 4 VERY active kids, I am used to being on the go all the time.  I very often feel defined by everything that I DO in a day.  Well...if you take all that away and DO nothing in a day...who are you and what is your importance to your family??  These are all things I have struggled with in the past, but not so this time!  I don't know if its because this is our last baby and I know I never have to do this again, or if I am finally able to truly appreciate there is NOTHING more important than getting this little babe here safe and sound, but whatever it is I have been able to find some things I can accomplish even while I am down and out that are making the time pass by quickly!

I have been working on getting caught up on my digital scrapbooking and typing up a bunch of my favorite recipes...but today I wanted to share a few simple projects I have been putting together for Cohen's nursery...all while lying on my couch :)

What did we do before PicMonkey??  I love how easy it is now to make your own custom printables to fit in any space and color scheme.  Cohen's nursery has big, bold patterns, airplanes and the colors navy, bright blue and orange.  LOVE!!

I made this 8x10 printable to frame and put on top of his dresser...simple and perfect for an airplane-themed room!


I made this next printable to hang over Cohen's crib.  I LOVE the simplicity of it, I was inspired by THIS great print

Finally, the project I am MOST excited about!!

Its not quite finished, but as soon as my hubs gets home I am putting him to work :)  I love mobiles and think they are a great way to add more fun and personality to your little ones nursery.  As I was searching for something for Cohen's room I could NOT find anything I even remotely liked.  I started to think if there was anything I could make...and it came to me!

Paper Airplanes!!

I found THIS amazing site with TONS of free digital papers.  I just printed out a bunch of different patterns in my colors and folded a million paper airplanes:)  I can't wait to see the finished product!


So those are just a few of the things I have been working on here...but I'd love to hear from you guys! Has anyone else ever been on bed rest or just down for a few days?  If so, how did you stay motivated and what in the world did you do when you finished the ENTIRE series of Downtown Abbey in 3 days?! 

2.13.2013

Last Minute Valentines Headband


Well, there's nothing like some last minute crafting before the big holiday, right?!

As I was thinking about our plans for tomorrow I knew I wanted to throw together some simple headbands for my girls to go with their cute little Valentine outfits.  I love having girls and how excited they get about little things like that :)

Luckily I had all the supplies already in my craft stash, and in less then 10 minutes I was able to throw together some simple, CUTE last minute Valentines Headbands.


All I needed for this cute headband was a dollar store headband, ( I have tons on hand always), 2 sweet tulle flowers I ordered recently from Pick Your Plum, a zebra print yo-yo flower I whipped up in minutes, and some E6000...best glue EVER :)
 

Once I had my flowers ready to go I....glued them on the headband.

That's it :)  Turned out pretty cute though!!


I love how simple this is, but how fun and festive it will be for tomorrow as well.  I love making things for my girls that will get a lot of use, and I know this 5 minute headband will definitely do that!

Are you all ready for tomorrow??  I have a few things my husband has to pick up at the store for me tonight, but I am pretty much ready to enjoy the day of LOVE with all the people in my life I love the most :)  Thanks so much for stopping by today!

Linking up HERE :)

2.06.2013

Conversation Heart Hair Clips


Hey everyone!!  I just wanted to pop in with a super quick and fun project your little girls will love this Valentines Day!

If you were around last year you may have seen our Conversation Heart Earrings, or our Conversation Heart Rings.  My girls LOVED wearing these fun and trendy pieces and I wanted to throw something similar together this year that they would love just as much.

Here is what we came up with!


These took about 15 minutes to make and my little ones are crazy about them.  All you need are some bobby pins, nail polish, and Conversation Hearts.


I quickly painted my bobby pins with different colors of nail polish and let them dry.  I am going to do this with ALL our bobby pins from now on...they look totally cute just like this! ;)


Once they were all dry I simply hot-glued some Conversation Hearts on each bobby pin and our clips were ready to go!


I told you they were easy ;)

Thanks so much for stopping by today!!

Linking up HERE!

1.21.2013

Valentines Day Mantel, EASY burlap banner!


Today I am sharing with you my Valentines Day Mantel!  I am so excited about how it all came together...especially since I actually made some of it myself!  If you know me, you know a craft that actually turns out is pretty rare ;)

On one side I framed the printable I whipped up that you can find HERE.  I also found this blue birdcage I fell in love with...and inside are my two little love birds ;)


On the other side I framed a piece of fabric that matched our LOVE sign and covered a foam heart in pink tulle and twine.  I also scored some burlap balls 90% off in the Thanksgiving Clearance section...perfect!!


I made this LOVE sign last year, and updated it just a teeny bit this year.  I re-modpoged 3 of the letters to update the color. and I absolutely adore it.  Its the perfect focal point for my mantel.


Finally this year I made a burlap banner to hang up.  This was SO easy and quick to put together, I think it adds the perfect finishing touch!


All I did was cut triangles out of burlap and hot glue them to some pink bakers twine.  Then, using a heart-shaped cookie cutter, I painted hearts on the burlap with acrylic paint.  


And there you have it!!  Do you decorate for Valentines Day?  It is quickly becoming one of my favorite holidays...just for the decor! ;)  

1.18.2013

Bakers Twine Valentine Wreath

 I had a great time yesterday and today during my little ones nap time finally updating my front door!  I mean really....it was time for the Merry Christmas sign to come down ;)  I dug through my craft stash to use anything I had on hand...and this fun Bakers Twine Valentine Wreath is what I came up with!


All I did was cover a wreath form in turquoise bakers twine I bought a few months back from Pick Your Plum.  After a few minutes of neatly wrapping it around I got bored and started doing it a lot more messy :)  I have serious attention issues when it comes to crafting.  Once I had the form covered in twine I haphazardly wrapped natural twine a few times around.  


Once I had that all done I cut out triangles of burlap and hot-glued them on the wreath.  Finally I made a bunch of fabric yo-yos and hot-glued them all together and PINNED them on the wreath.  Then, once spring time rolls around I figure I can make a new embellishment and turn my valentines wreath into my spring wreath! :)

I love the pop of color my new wreath added to my brown front door, and I always love anything with Baker's Twine ;)  Thanks for stopping by today!

Linking up at these great parties!

10.11.2012

Washi Tape Pumpkin

 Hey everyone!!

Halloween fun is in full swing at our house, and the kids have been begging to get out our decorations!  They were very sad when they realized our decorations consisted of one or two signs and some fabric-covered pumpkins I made last year ;)

Obviously I needed to add to our dwindling decorations, so off to the store we went!

I found these great craft pumpkins at Target for $6!  I thought that was pretty good for a pumpkin that will last for YEARS :)  Plus I loved the white color...I don't do orange at Halloween in my house ;)  


I got my pumpkin home, placed it on my mantle...and realized it desperately needed SOMETHING :)
I am just not in the place of life to be doing ornate, messy crafts right now so I needed something quick and mess-free.  

My choice?  Washi Tape!!


Weeks ago I got a few packs of Washi tape from Pick Your Plum and have just been waiting for the perfect occasion to use them.  I knew this pumpkin makeover was just that!

This was crazy easy.  Starting at the top I would run the strip of tape until I reached the bottom of the pumpkin, then repeat until I had the pumpkin striped just the way I wanted it.


After I finished I thought it still needed a little bit more.  Luckily when you buy Washi Tape from Pick Your Plum it comes with another coordinating roll...I thought the polka dots finished my pumpkin off perfectly!


Turned out pretty cute, right?! ;)

I am THRILLED with our newest addition to our Halloween decor!  Its simple, chic, and I literally threw it together while my kids were eating breakfast this morning :)


Thanks for checking out my most recent crafty attempt!!  I hope you are having a fantastic day wherever you are, stop by later for some fun Witchy activities for your little girls!!